
Base Defense Guide for Survive Deep in the Woods
Where to put fences, gates, turrets and mines in Survive Deep in the Woods, how the Beast gets past them, and what to do when your walls break.
In Survive Deep in the Woods, walls don't make a base safe — they make the Beast spend time and health getting in. The arrangement behind the recorded farmer wins is consistent: an enclosed perimeter with one openable gate, turrets and ballistas rotated to face the approach the Beast actually uses, mines laid on that path, and an escape exit left open in case everything else fails. The weakness you must plan around is just as consistent: every structure has health, and the Beast destroys all of them — fences, gates, even ballistas — so walls buy time, never immunity.
This page is about improving a base that already exists. If you're still placing your first shelter and chicken coop, the base building guide covers starter materials and the construction interface.
What each defense actually does to the Beast
Defensive pieces do two very different jobs, and the recorded runs treat them differently.
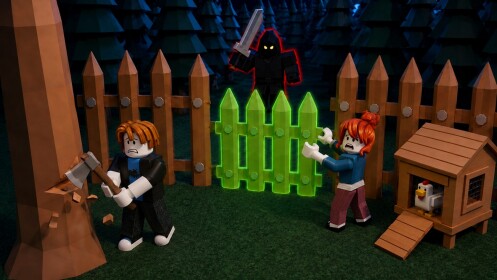
Blockers hold a perimeter. Fences and walls physically stop the Beast, which then has to chew through them. A chased player slams up fences "in case he comes after us" and hopes they'll "block him out"; from the attacking side, a Beast player is "finally breaking the fence" of a runner who immediately "puts up his fence again," and against a golden-fenced fort he must destroy three ballistas one by one because "they have a lot of health." Blockers delay; they don't remove the threat.
Gates are the controlled opening. A fenced base has an operable closed state — "Let me close the fences" — and the golden fence is worked open and shut ("Buka. Tutup" — open, close) while plain iron sections can't be opened at all, which is how one player got locked inside his own metal walls. From the Beast's side, raiding a defended farm is "starting to fight these gates": the gate is the point the Beast has to beat to get in.
Guns are the damage layer. Armed towers, the ballista, the automatic turret and land mines shoot the Beast on approach instead of physically stopping it. One Beast player lost "100 GP" just closing on a gun line, then "200 health" on the next push, and roughly 300 more breaking into a layered fort — and he started that raid with 500 health. Land mines are one-shot: "the landmine only works once."
Two limits repeat across every recording. First, nothing you build is invulnerable: the build-menu sweep that lists "all kinds of armed towers, a ballista, walls, even metal walls" comes with the warning that the Beast destroys towers too, and one fort-builder admits a wall "helps to stall for time… might only last for about 3 seconds." Second, it's unsettled whether the Beast can jump low walls: a farmer hiding behind his fences feared it, while a Beast player circling a refuge he couldn't climb insisted "Tuan buas enggak bisa lompat ya" — it can't jump. No recorded round settled the question, so enclose fully and build as if the Beast can break anything but climb nothing.
| Piece | Role in the ring | Cost seen in play* |
|---|---|---|
| Wood fence | Starter perimeter blocker; one run's fence piece doubled as the gate (pintu pagar) | ~75 |
| Thick wood wall | Heavier blocker ("finally thick") | ~175 |
| Stone wall | Wall tier picked as the "stronger" rebuild after a death | ~50 in one build review |
| Spike wall | Wall tier unlocked alongside the stone wall | not shown |
| Metal / iron wall | Toughest solid wall — cannot be opened, so it traps careless owners inside | not shown |
| Golden fence / gate | Openable gate piece placed once rich | gold only |
| Watch tower | Defensive structure listed in one build review | ~150 |
| Ballista / auto turret / armed towers | Shoot the Beast on approach; high health but destructible | ~300 for a turret |
| Land mine | One-shot trap for the approach path | not shown |
*Costs are figures players said out loud or paid on screen in individual recorded runs — useful for planning, not a verified price list.
Where to place it all
Enclose the base and control the approach. Fences go "around the base," and a beginner guide frames the purpose as making the base safer and controlling "where enemies can approach from." One defender puts his best piece exactly where the Beast can come from: "I'll place the metal wall on this side — can he get through or not?" Identify the side the forest actually lets the Beast approach from, put the strongest tier there, and budget weaker pieces for the rest of the ring.
Work one openable gate into the ring — and manage it. A perimeter of only iron sections locks you in as surely as it locks the Beast out; one player wailed "Gua mau keluar gak bisa" — I can't get out. A gate or golden fence lets you welcome teammates, seal during a raid and still escape. Just don't seal it while people are still outside: "Closing it off? If you do that, the people outside are all going to die."
Rotate guns to face the approach before placing. A mis-oriented turret is wasted money — "I placed it facing the wrong way. Give me my money back" — so turn the piece into position first, the way careful defenders do before confirming the placement.
Mines go on the path, and each works once. One defender spells out the intent: "I place a mine here so if he comes, he gets caught." Because a mine is single-use, treat it as a surprise for the first push, not reusable cover.
Leave yourself an exit. A corner-spawn guide calls the emergency escape "very important" and cuts it two blocks wide, "because if the beast traps you, you'll have no way of escaping except for the exit the beast is blocking." Other players keep a dedicated escape passage behind the defense line, or pre-plan a fallback route their turret swarm covers: "If the ghost comes here, I'm going to run over here… they'll have to face the swarm of turrets I've farmed up."
Layer firepower where the Beast has to pass
The kill recipe in the recorded wins is blockers and guns on the same path. One farmer designs it in advance: "If Mikey runs here, he will start taking damage because I have three tower cannons. There are also some projectiles… I need to place some mines too. So he will be completely destroyed if he runs." When the raid comes, the Beast smashes the gates into that layer — and dies in it: "We already won as farmers, because my cannons defeated Mikey."
A finished base doesn't just damage raids; it can deter them outright. One Beast player is invited into a walled base — "Masuk aja, Bro" (come in, bro) — and refuses to enter; another gives up outside a gun cluster: "when you face turrets as brutal as these, you just give up."
Funding note: everything with firepower is bought with gold, not wood — "to place all kinds of towers and mines, you don't need wood, you need more gold" — and golden gates cost only gold too. Chicken farms are the starting income, scaling into pig, cow and bee farms; the farmer guide details the economy, and the wood guide speeds up the lumber side that pays for walls and gates.
Finish the ring before the hunt starts
Timing decides raids. Speaking as the Beast, one player explains rushing the early game "because if we find them late, they will already develop strongly. Put up there, you know, turrets, some fences, and then they cannot be beaten." The farmer-side version: once your base produces good gold and "your defenses are properly set up, surviving beast attacks becomes way more manageable." So upgrade the ring while the Beast is still hunting someone else, and re-check the build menu each time new tiers unlock — several runs only find stone, spike and metal walls, turrets and mines mid-round. For the full night-by-night plan around these defenses, see the how to survive the night guide.
When the Beast breaks through
Assume losses. In the recorded raids it breaks fences "one after another," smashes gates and knocks ballistas down one by one, and wrecking a farm has a direct economic cost: "I broke your farm and most likely you are starting your money earning from scratch there now." Beast-side play targets buildings for exactly that reason — "we destroy it so the enemy can't earn money."
What players actually do when defenses fail, in the recordings:
- Rebuild stronger. After dying and respawning, one player returns to his old base and upgrades the ring: "Kita harus bikin yang lebih kuat" — we have to build a stronger one — placing stone wall and spike wall.
- Stack more guns. A defender under raid keeps adding turrets mid-fight: "I continue to throw even more of them here so that you simply cannot get close here."
- Relocate. When a spot can't be held, abandon it: "It's time to run, viewers, it's really time to relocate… because we can't defend ourselves at all."
One honest gap: none of the recorded gameplay shows a damaged wall being repaired in place — no repair interaction or cost appears, so don't build a mid-raid plan around fixing walls. The proven recovery moves are re-placing defenses, upgrading the tier, or moving on.
Team defense: one shared fort, maybe one decoy
Team rounds change the math. The direct recommendation: "Instead of everyone building separate bases, you can all work on one shared base, which makes construction faster and gives you a much safer area overall," later upgraded "with turrets, ballistas, and land mines." The observed version of that: two farmers stack every gun at a single fort, the Beast loses 300 health breaking in, concludes "I do not know what he needs to do to get through," and the round ends "we win guys… I really could not attack them."
Deception is a one-run trick worth knowing: a player builds a fake base with a chicken coop "so that the beast sees it and leaves," hides the real base behind it using a corner and a zigzag shape, and seals it with what he calls an "impenetrable wall." It won him his round; treat it as a gambit against a Beast that moves on sight, not a proven counter.
If your base already stands, pick one upgrade from this page for tonight: close the ring with an openable gate, rotate the next turret to face the approach the Beast actually uses, cut the two-block escape you've been putting off, and sink farm gold into one more gun before dark. For what the Beast does on the far side of the wall, read the Beast guide; to end raids with weapons instead of fences, the how to kill the Beast guide picks up from there. New to the game entirely? Start with the beginner guide.
Related Guides
Base Building Guide
Build your first base step by step: gather wood, place a chicken farm, shelter and fences, with starter costs.
How to Defeat the Beast
Layer turrets, walls and team guns to kill the Beast outright, and know when sunrise is the safer win.
How to Survive the Night
Follow the Farmer night routine: shelter and fences early, farm gold into turrets, and reach the sunrise win.
Beast Guide
Master every hunter ability, tracking tools and traps, and see what a successful hunt needs before sunrise.